
Getting started and navigation
Document: LK-MAN-EN-01 · Version: 0.1
Last updated: 2026-07-18 · Status: draft / requires product review
Audience: all users · Plan: all plans
Screenshots use a synthetic organization and identities. Actual availability depends on the active organization's plan, role, and configuration.
Contents
- Purpose and scope
- Accessing the platform
- Active organization
- Overview
- Main navigation
- Recommended workflow
- Personal preferences
- Good practices
- Related references
<a id="purpose-and-scope"></a>
1. Purpose and scope
This manual explains how to sign in, select the working context, read the initial summary, and navigate every LúminaKite area. Detailed monitoring and administration procedures are covered in manuals 02 and 03.
LúminaKite organizes information by organization. Domains, findings, evidence, cases, monitors, and integrations are associated with that context; always check the active organization before creating or changing information.
<a id="accessing-the-platform"></a>
2. Accessing the platform
2.1 Sign in
- Open the URL supplied by your organization.
- Enter your email and password.
- Complete the second factor when MFA is enabled.
- Confirm that the active organization name is correct.
The platform also supports account activation, recovery, and password reset. Never share passwords, MFA or backup codes, tokens, or API keys.
2.2 Access controls
- Authentication protects private views and APIs.
- Authorization combines the user's role and organization context.
- Sessions and credentials are personal; do not use shared accounts.
- If exposure is suspected, change the password, revoke affected credentials, and notify the internal owner.
<a id="active-organization"></a>
3. Active organization
The organization selector appears in the header when the account can access more than one. Changing it updates the data and permission context.
Before operating:
- Check the organization's name and plan.
- Confirm your role:
Member,Admin, orOwner. - Review limits and capabilities under Billing if a function is missing or locked.
Multi-organization support is included by default from Pro. An invitation must be accepted before access becomes available.
<a id="overview"></a>
4. Overview
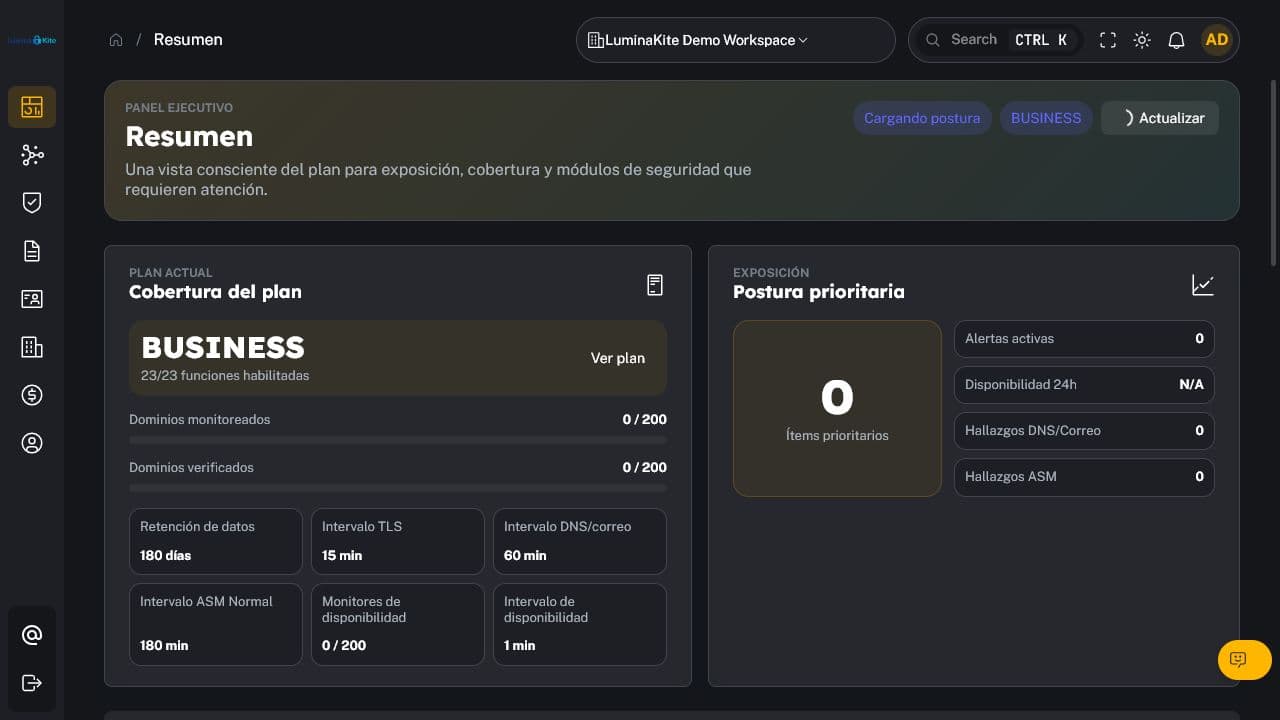
Figure 1. Posture, plan, and limit summary for the active organization. Captured: 2026-07-18.
Overview gathers indicators used to prioritize work:
- posture or risk score and trends;
- monitored assets and domains;
- findings and alerts by severity or state;
- open cases and recent activity;
- DNS/email, ASM, and uptime status;
- current plan, enabled capabilities, and limit consumption.
An aggregate indicator supports prioritization but does not replace evidence review. Open the associated domain, finding, or case before making a decision.
<a id="main-navigation"></a>
5. Main navigation
| Area | Purpose | Default minimum plan |
|---|---|---|
| Overview | Posture and activity summary | All |
| My domains | Add, verify, inventory, and inspect domains | All |
| Alerts | Unified events requiring attention | All |
| Cases | Remediation tracking | All |
| Brand | Brand protection and related findings | Business |
| Findings | Normalized risk and evidence | All |
| DNS & Email | DNS, SPF, DKIM, and DMARC posture | Basic: all; full: Pro; RUA: Business |
| Uptime | Monitors, regions, maintenance, and public pages | Basic: all; advanced: Pro |
| ASM | Attack surface discovery and assessment | Normal: all; Plus: Business |
| Reports | Executive and technical reports | Pro |
| Identity Leaks | Assets, providers, and identity exposure | Pro |
| Organization | Members, invitations, roles, keys, and audit | Role-based; multi-org from Pro |
| Billing | Plan, capabilities, limits, payments, and invoices | Owner |
| Profile | Account, security, preferences, and privacy | All |
Depending on version and screen width, the header may also offer search, theme selection, full screen, notifications, or the account menu.
<a id="recommended-workflow"></a>
6. Recommended workflow
Select organization → review Overview → prioritize alert/finding
→ validate evidence → open or update case → remediate
→ request recheck → confirm closure → document or report
- Start with severity, exposure, and asset criticality.
- Validate evidence and scope before escalation.
- Use a case whenever the work needs an owner, state, or traceability.
- Record risk acceptance only with authorization and a review date.
- Run a recheck after applying the correction.
- Generate a report when the state must be communicated outside daily operations.
<a id="personal-preferences"></a>
7. Personal preferences
Under Profile, each user may manage, subject to availability:
- name and profile image;
- English or Spanish language;
- time zone and date/time formats;
- password and MFA;
- optional consents kept separate from necessary service functions;
- personal-data export, correction request, and account closure.
Language changes should be reflected across the interface. Report any text unavailable in both English and Spanish.
<a id="good-practices"></a>
8. Good practices
- Monitor only assets that you own or are expressly authorized to assess.
- Do not copy secrets, credentials, or sensitive evidence into comments or free-text fields.
- Use cases and states to preserve decision traceability.
- Apply least privilege to roles and API keys.
- Periodically review members, pending invitations, integrations, and alert channels.
- Treat links to unpublished status pages as internal information.
- Sign out on shared devices and keep the browser current.
<a id="related-references"></a>
9. Related references
Change control: v0.1 — initial creation, 2026-07-18.